

Sewing time everybody!
Here is another pillow case tutorial, this one being favorite. It is so simple and easy to make it will only take you one hour and a half! I literally made this pillow case two days prior to market ☺ and I received so many compliments on it that I couldn't resist share the steps with all of you! Have fun sewing☺
What you'll need:
Matching Thread
2/3 of batting
2/3 yards of PE-420
1/4 yard of PE-436
1/8 yard of PE-454
Fat Quarter of DAR-54300
Fat Eight of DAR- 54304
Fat Eight of DAR- 64311
Fat Eight of DAR- 64305
Fat Eight of DAR- 54306
Cutting Instructions
*WOF (Width of the fabric)
*Download the ABCDE Patterns in an 8.5 by 11 card-stock paper
*WOF (Width of the fabric)
*Download the ABCDE Patterns in an 8.5 by 11 card-stock paper
PE-420 Cut two (2) 20'' by 20''
Batting Cut two (2) 20'' by 20''
PE - 436 Cut four (4) 1'' by WOF
PE - 454 Cut two (2) 1'' by WOF
DAR-54304 cut PATTERN A
DAR-54300 cut PATTERN B1, B2, B3
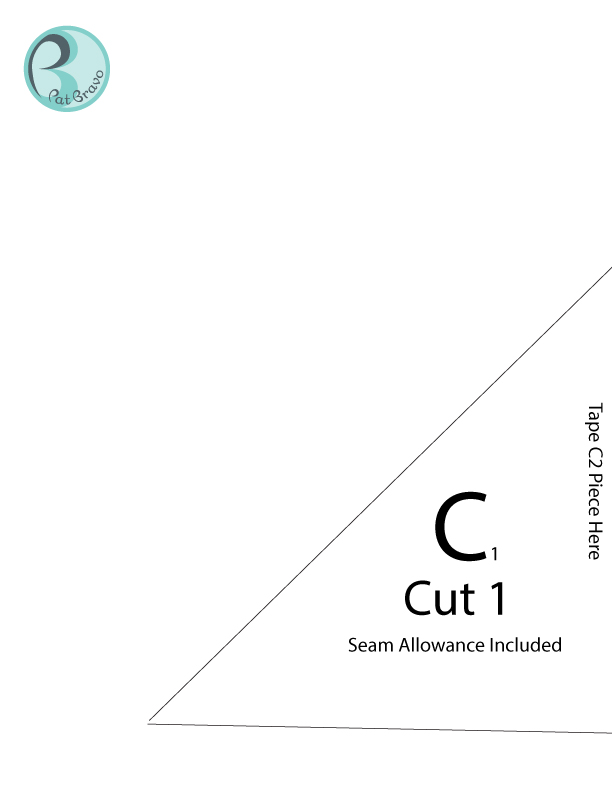
DAR-64311 cut PATTERN C1, C2
DAR-64305 cut PATTERN D1, D2
DAR-54306 cut PATTERN E1, E2
Step 1
Start by creating the strip connectors. Grab the four (4) 1'' by WOF of PE-436 and the two (2) 1'' by WOF by PE- 454 and connect them (with 1/4 seam allowance) in the order below. That way you will end up with two strips measuring 2'' by WOF

Later start cutting the strips as instructed in the diagram 2. For the Wedge pillow case, you will need four strip connectors.

Step 2
This part is a bit tricky but fun, lets start laying out our pillow case design with our DAR-54304,54300, 64311, 64305 and 54306 pieces already cut from the downloadable ABCDE patterns.
The order of the placements is explained in the image below, taking into consideration that the black strips are our connector strips just completed in step 1

So lets begin! Take piece A, C and strip connector measuring 2'' by 9.5'' and attach them as the image below explains. Remember, always using a 1/4 seam allowance.

Once the three pieces are attached, continue by adding the 2'' by 24'' strip connector.

Now take piece B and attached it with the rest of the connected pieces.

You will notice some extra fabric from the connectors, trim it and start attaching the 2'' by 18'' connector.


Step 3
Take the two (2) 20'' by 20'' squares from PE- 420 fold the edges under by 7 inches and iron press, so they will not unravel over time. After this, if desire, straight stitch the folded edge.


Batting Cut two (2) 20'' by 20''
PE - 436 Cut four (4) 1'' by WOF
PE - 454 Cut two (2) 1'' by WOF
DAR-54304 cut PATTERN A
DAR-54300 cut PATTERN B1, B2, B3
DAR-64311 cut PATTERN C1, C2
DAR-64305 cut PATTERN D1, D2
DAR-54306 cut PATTERN E1, E2
Step 1
Start by creating the strip connectors. Grab the four (4) 1'' by WOF of PE-436 and the two (2) 1'' by WOF by PE- 454 and connect them (with 1/4 seam allowance) in the order below. That way you will end up with two strips measuring 2'' by WOF

Later start cutting the strips as instructed in the diagram 2. For the Wedge pillow case, you will need four strip connectors.

Step 2
This part is a bit tricky but fun, lets start laying out our pillow case design with our DAR-54304,54300, 64311, 64305 and 54306 pieces already cut from the downloadable ABCDE patterns.
The order of the placements is explained in the image below, taking into consideration that the black strips are our connector strips just completed in step 1

So lets begin! Take piece A, C and strip connector measuring 2'' by 9.5'' and attach them as the image below explains. Remember, always using a 1/4 seam allowance.

Once the three pieces are attached, continue by adding the 2'' by 24'' strip connector.

Now take piece B and attached it with the rest of the connected pieces.

You will notice some extra fabric from the connectors, trim it and start attaching the 2'' by 18'' connector.

Almost there, only a few steps to finish the pillow top. Now take piece D and attache it the just sewn connector and trim extras.

Now it's time to attach our last connector 2'' by 19'' to our almost complete piece! Yeiii!

Don't forget to trim the extra fabric from the recently attached connector. Lastly take piece E and sew it as explained in the image below. And there you have it! your pillow top is now complete!

Take the 20'' by 20'' squares of batting and place the finish pillow on top of it. Now it's quilting time. In this case, I decided to go around each piece except the edges. Pin pillow case in place and start quilting with an 1/8 seam allowance as explained below.

Step 3
Take the two (2) 20'' by 20'' squares from PE- 420 fold the edges under by 7 inches and iron press, so they will not unravel over time. After this, if desire, straight stitch the folded edge.

Step 4
Start by laying the front piece of the pillow with the right side (ABCDE pieces) facing up and place the back panels on top with right side facing down. Pin all the pieces together and sew around with an 1/4 inch seam allowance.

And voila! Your Wedge pillow case is complete, I hope you all enjoyed this tutorial as much as I enjoyed making it!
Happy sewing everyone!
Pat B.
Pat Bravo Design : The Wedge Pillow Case >>>>> Download Now
ReplyDelete>>>>> Download Full
Pat Bravo Design : The Wedge Pillow Case >>>>> Download LINK
>>>>> Download Now
Pat Bravo Design : The Wedge Pillow Case >>>>> Download Full
>>>>> Download LINK I8
Transform your kitchen without you having to spend just a little
ReplyDeletetransform your kitchen with no needing to spend some money
# make your kitchen more functional and without spending some money
transform your kitchen with no needing to spend a small fortune